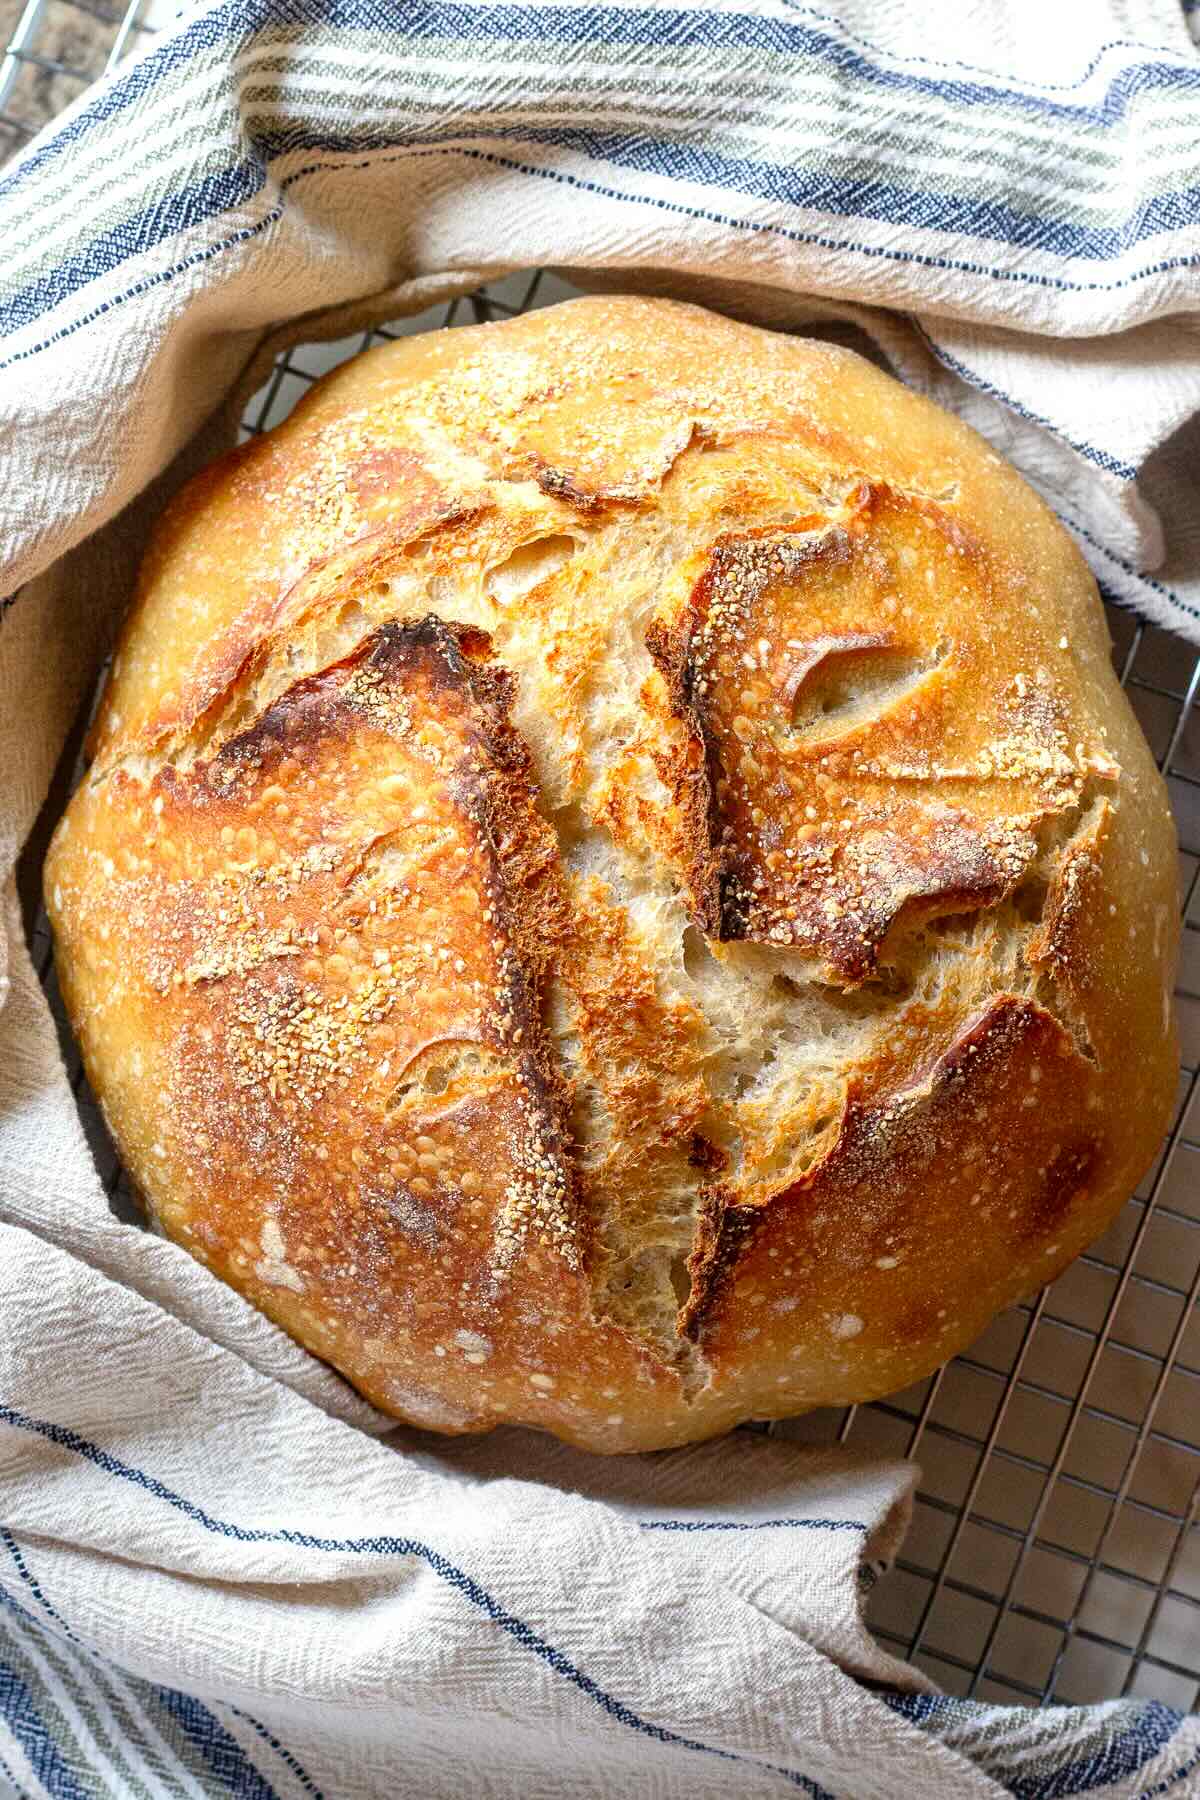
This easy sourdough bread for beginners recipe yields a rustic loaf with a golden crust and a soft, airy interior. Pairs beautifully with my Turkish Eggs High-Protein Breakfast Recipe!
It took me several trials to figure out the best way to make sourdough bread. I experimented with different fermentation methods and eventually settled on two approaches that I adapted to fit my schedule and techniques. You can check out these methods at Natasha's Kitchen and Alexandra Cooks.
After a few failed tries, I finally got it right, and it's absolutely delicious! Enjoy it with my Avocado Spread with Feta, pair it with my Avocado Omelette with Spinach and Tomato, or treat yourself by serving it alongside my Homemade Nutella made with coconut oil and coconut sugar.
Jump to:
Is Making Sourdough Really Worth It?
I must admit, I though that making sourdough bread would be a fun little project. After seeing so many gorgeous loaves on social media, I figured it couldn't be that hard. I mean, I'd baked bread with regular yeast in my Homemade Olive Bread with Whole Wheat Flour before, so why would sourdough be any different, right?
Well… I quickly learned it wasn't quite as simple as I imagined. My first struggle was with the starter. I didn't even make it to baking the actual loaf! The truth is, my "failure" wasn't because the wild bacteria and yeast didn't want to cooperate, but because I didn't give it enough time. Sourdough is all about patience, and once I finally let my starter grow and develop properly, the rest of the process suddenly made sense.
Top Tip
Sourdough bread is easier to digest than regular bread because the long fermentation breaks down gluten and phytic acid. It also helps your body absorb more minerals, such as iron and magnesium. Additionally, sourdough stays fresh longer without preservatives, has a lower impact on blood sugar levels, and offers a deliciously rich flavor with every bite. Learn more about this on Sourdough.co.uk and explore the scientific perspective at IFAS Taylor County Blog.
Why You'll Love This Easy Sourdough Bread Recipe
And here's the best part: once you have a healthy starter, making the loaf is not hard at all. That's why I know you'll love this recipe:
- Minimal physical work: No kneading for hours! Most of the effort is just waiting while the dough rests.
- Beginner-friendly steps: With stretch-and-folds instead of heavy kneading, it's easy to build structure in your bread.
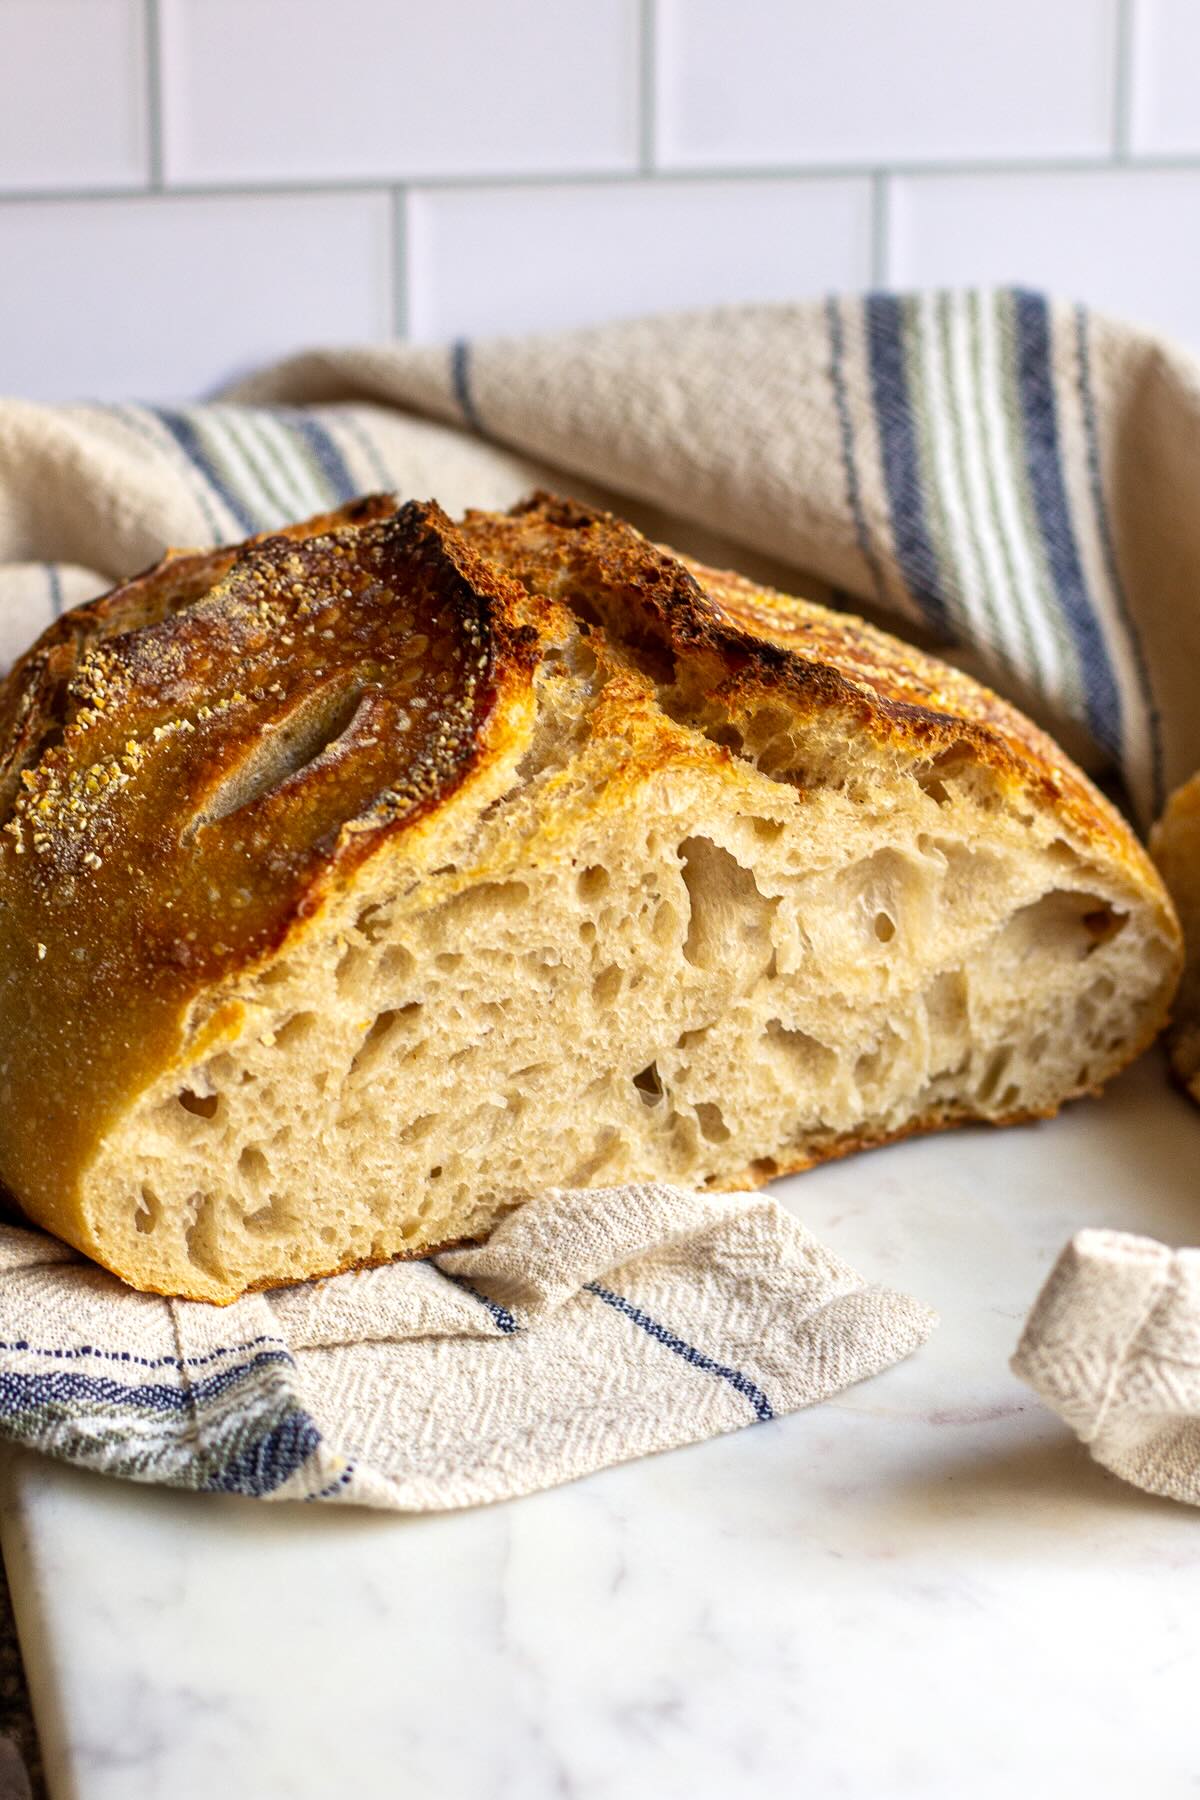
- Incredible flavor and texture: Slow fermentation develops a depth of flavor and a beautiful open crumb you can't get with regular yeast bread.
- That golden, crispy crust: Baking in a Dutch oven creates the perfect artisan-style crust at home.
- Flexible schedule: The overnight fermentation in the fridge works with your day, allowing you to bake fresh bread at your convenience.
Ingredients You'll Need
- Active sourdough starter*: This is the key to a flavorful and airy loaf. Ensure it is bubbly and active before use.
- All-purpose flour: I conducted several trials using both all-purpose flour and bread flour, and both yielded satisfying results.
- Whole wheat flour: I love adding whole-wheat flour because it adds a nutty flavor and extra fiber.
- Salt
- Warm water
- Cornmeal or flour: For dusting the bread basket to prevent sticking and give a nice crust.
*Don't have a starter yet? Try one of these excellent guides: King Arthur Baking, The Perfect Loaf, or Feasting at Home.
How to Make This Beginner-Friendly Sourdough Bread
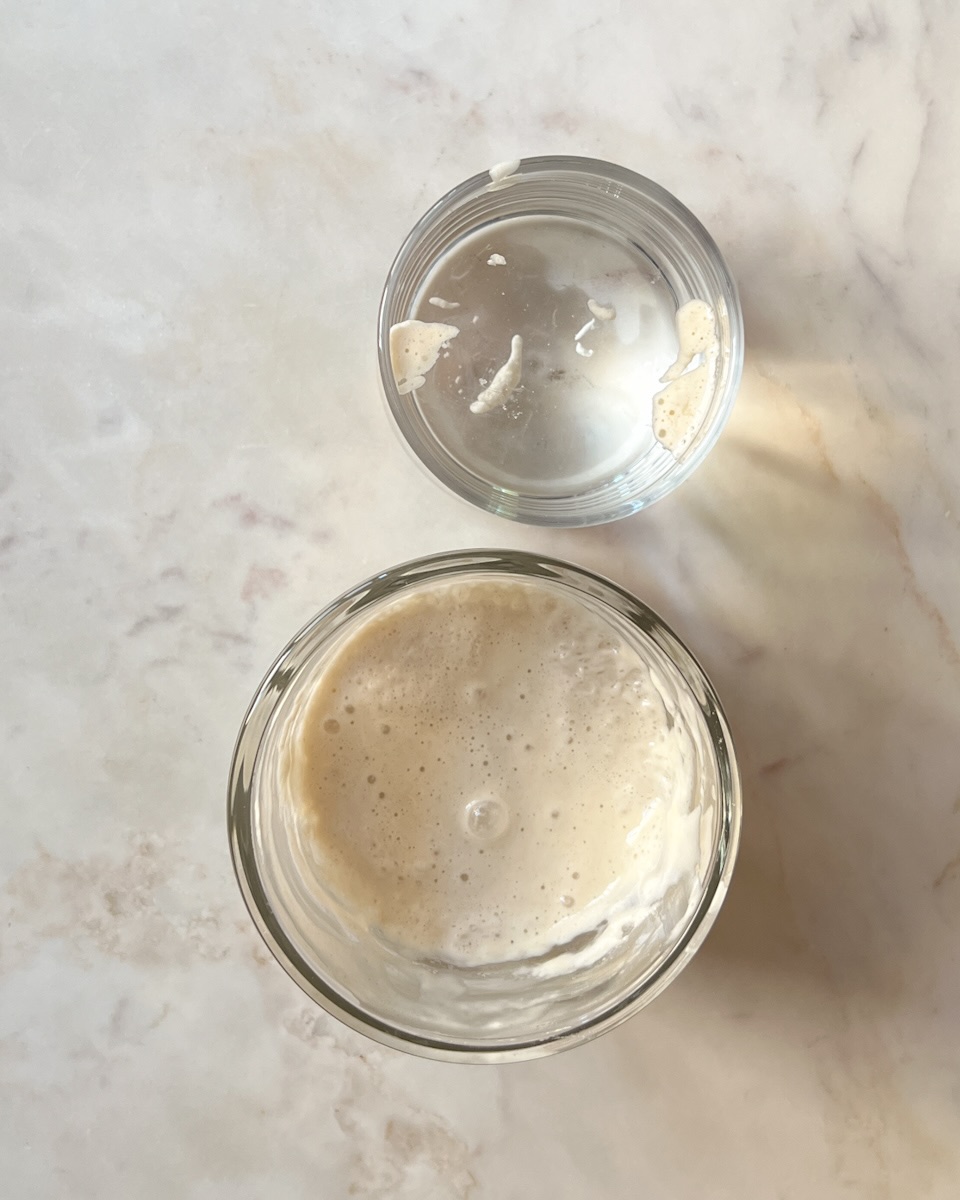
- Step 1: Test your starter. Scoop a small spoonful of starter into a glass of water. If it floats, it's active and ready to use. If it sinks, give it a few more hours to rise.
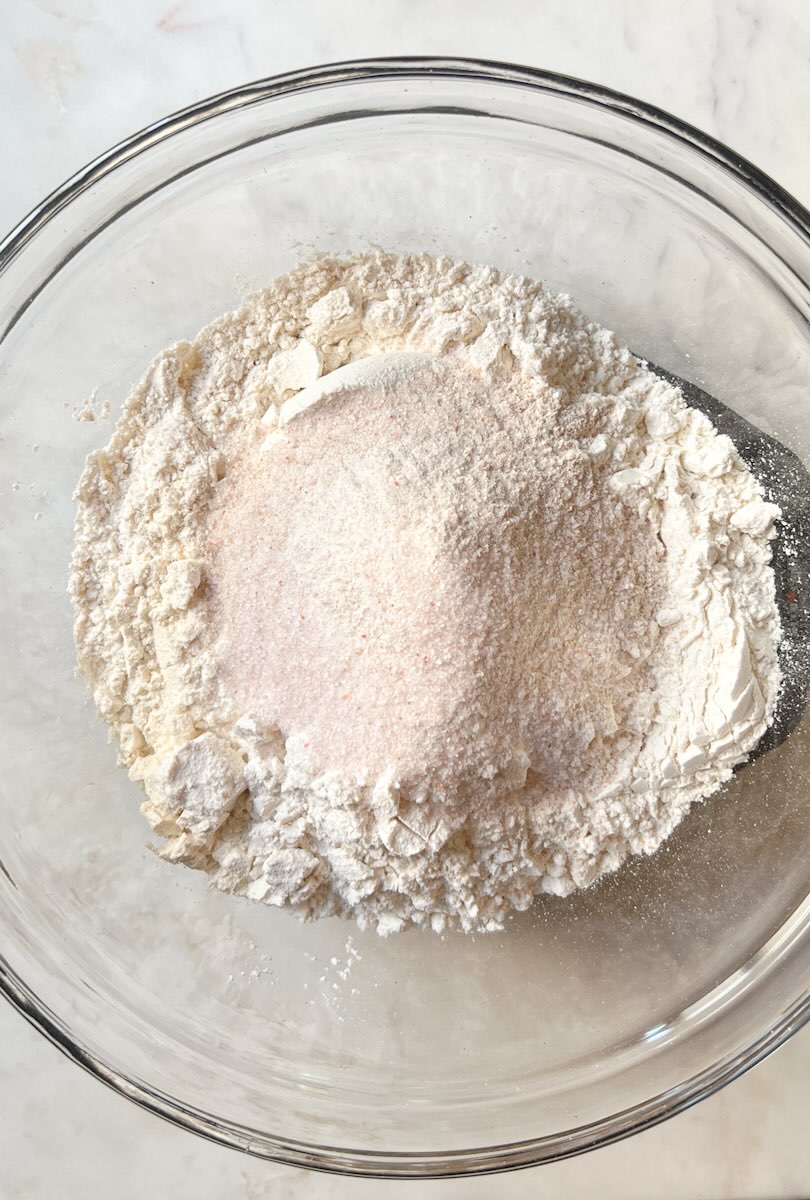
- Step 2: Mix the dough. In a large bowl, combine the all-purpose flour, whole wheat flour, and salt. Add the sourdough starter and water. Mix with clean hands until the ingredients come together. The dough will be sticky; that's normal. Cover with plastic wrap and let it rest for 45 minutes.
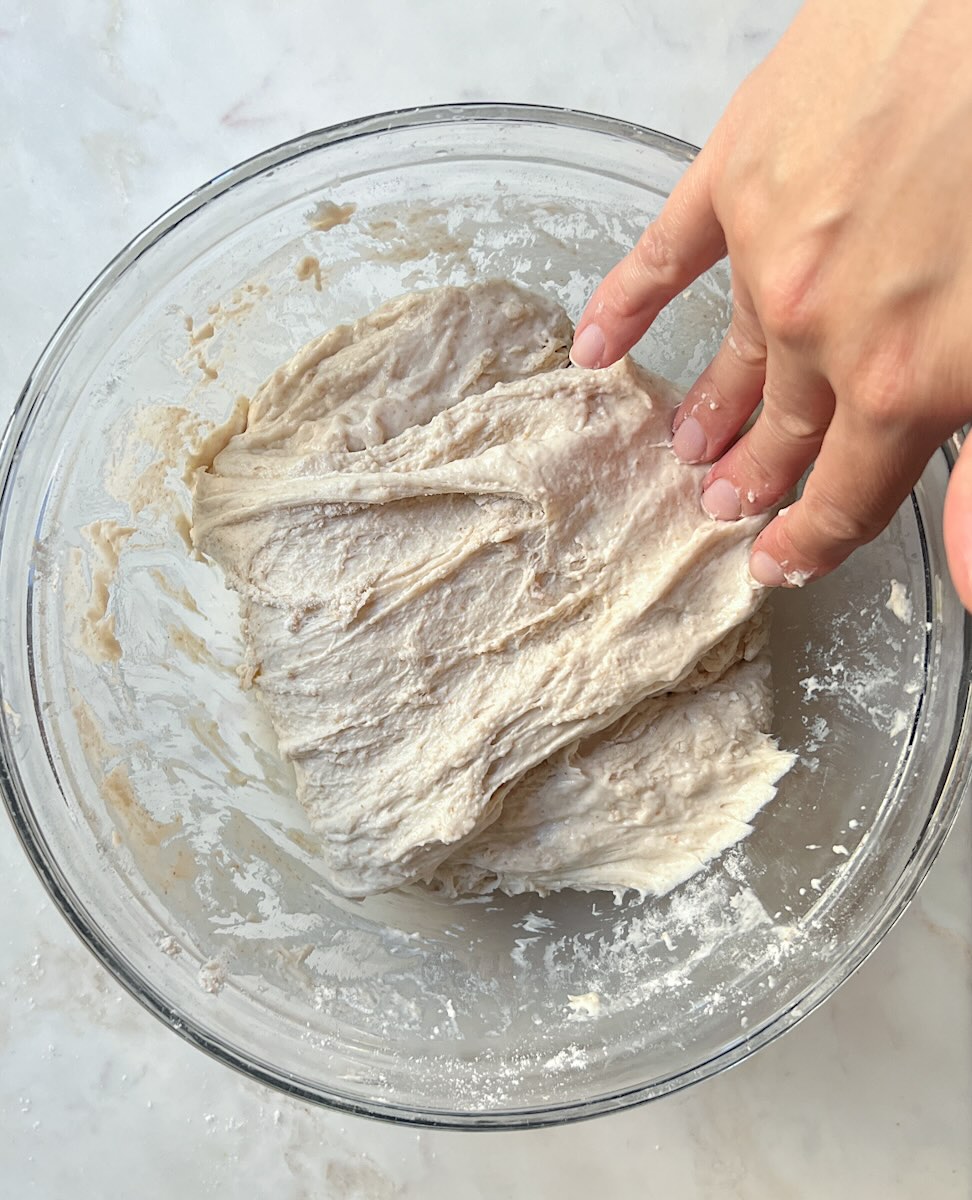
- Step 3: Stretch and fold. After resting, gently stretch one side of the dough upward and fold it over the center. Rotate the bowl and repeat on all four sides. You'll know when to stop pulling because the dough will start to resist. Cover and rest for another 45 minutes. Repeat this process four times in total, every 45 minutes. This helps strengthen the dough.
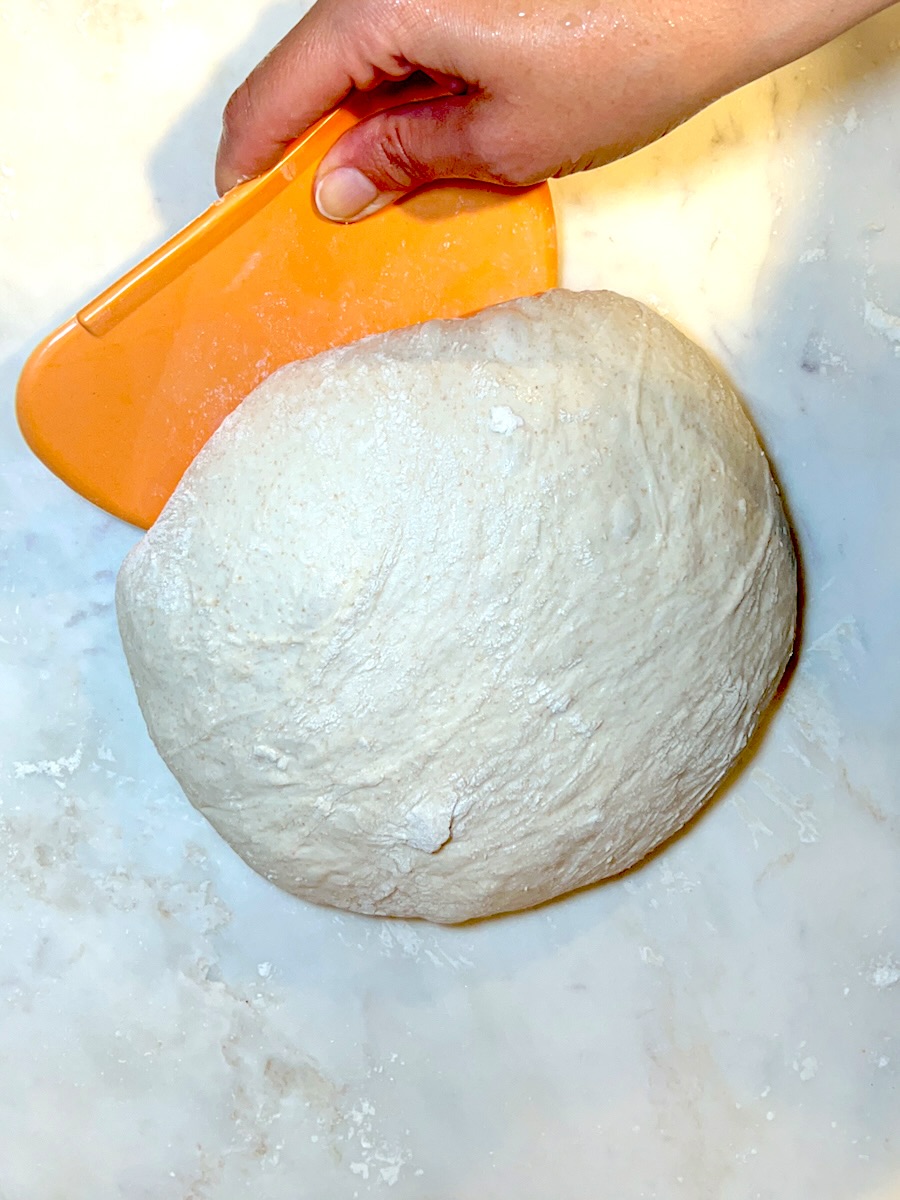
- Step 4: After about 4 hours, dust a wooden board with flour and transfer the dough onto it. Stretch and fold on all four sides, then use a shaping tool to form it into a round loaf. Cover with a kitchen towel and let it rest for 15-20 minutes. If it spreads out or loses its shape, reshape it.

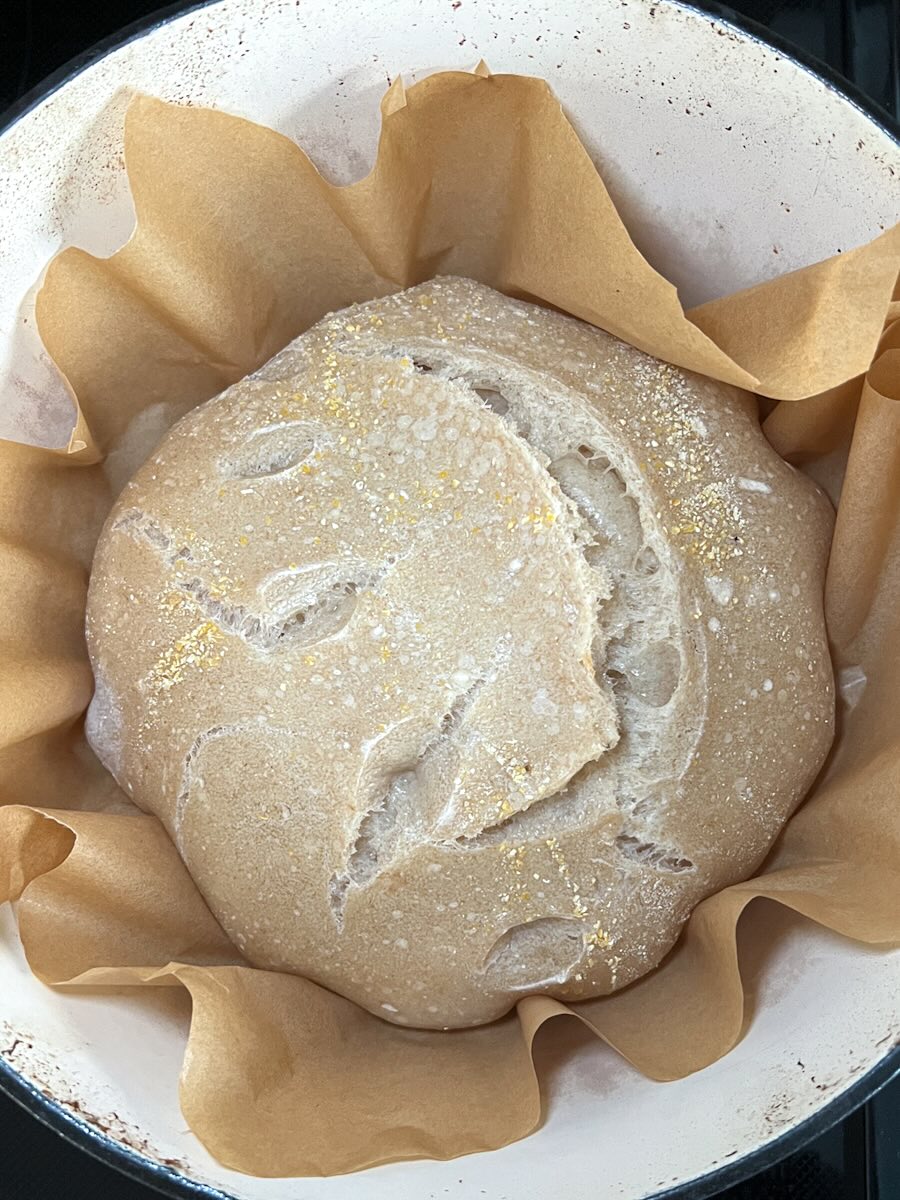
- Step 5: Overnight fermentation. Place the shaped dough into a sourdough bread basket that has been dusted with flour or cornmeal. Cover and refrigerate overnight, ideally 12-18 hours (up to 24 hours is fine).

- Step 6: Preheat the oven. The next day, preheat your oven to 240°C (465°F) with the Dutch oven inside for 20 minutes.
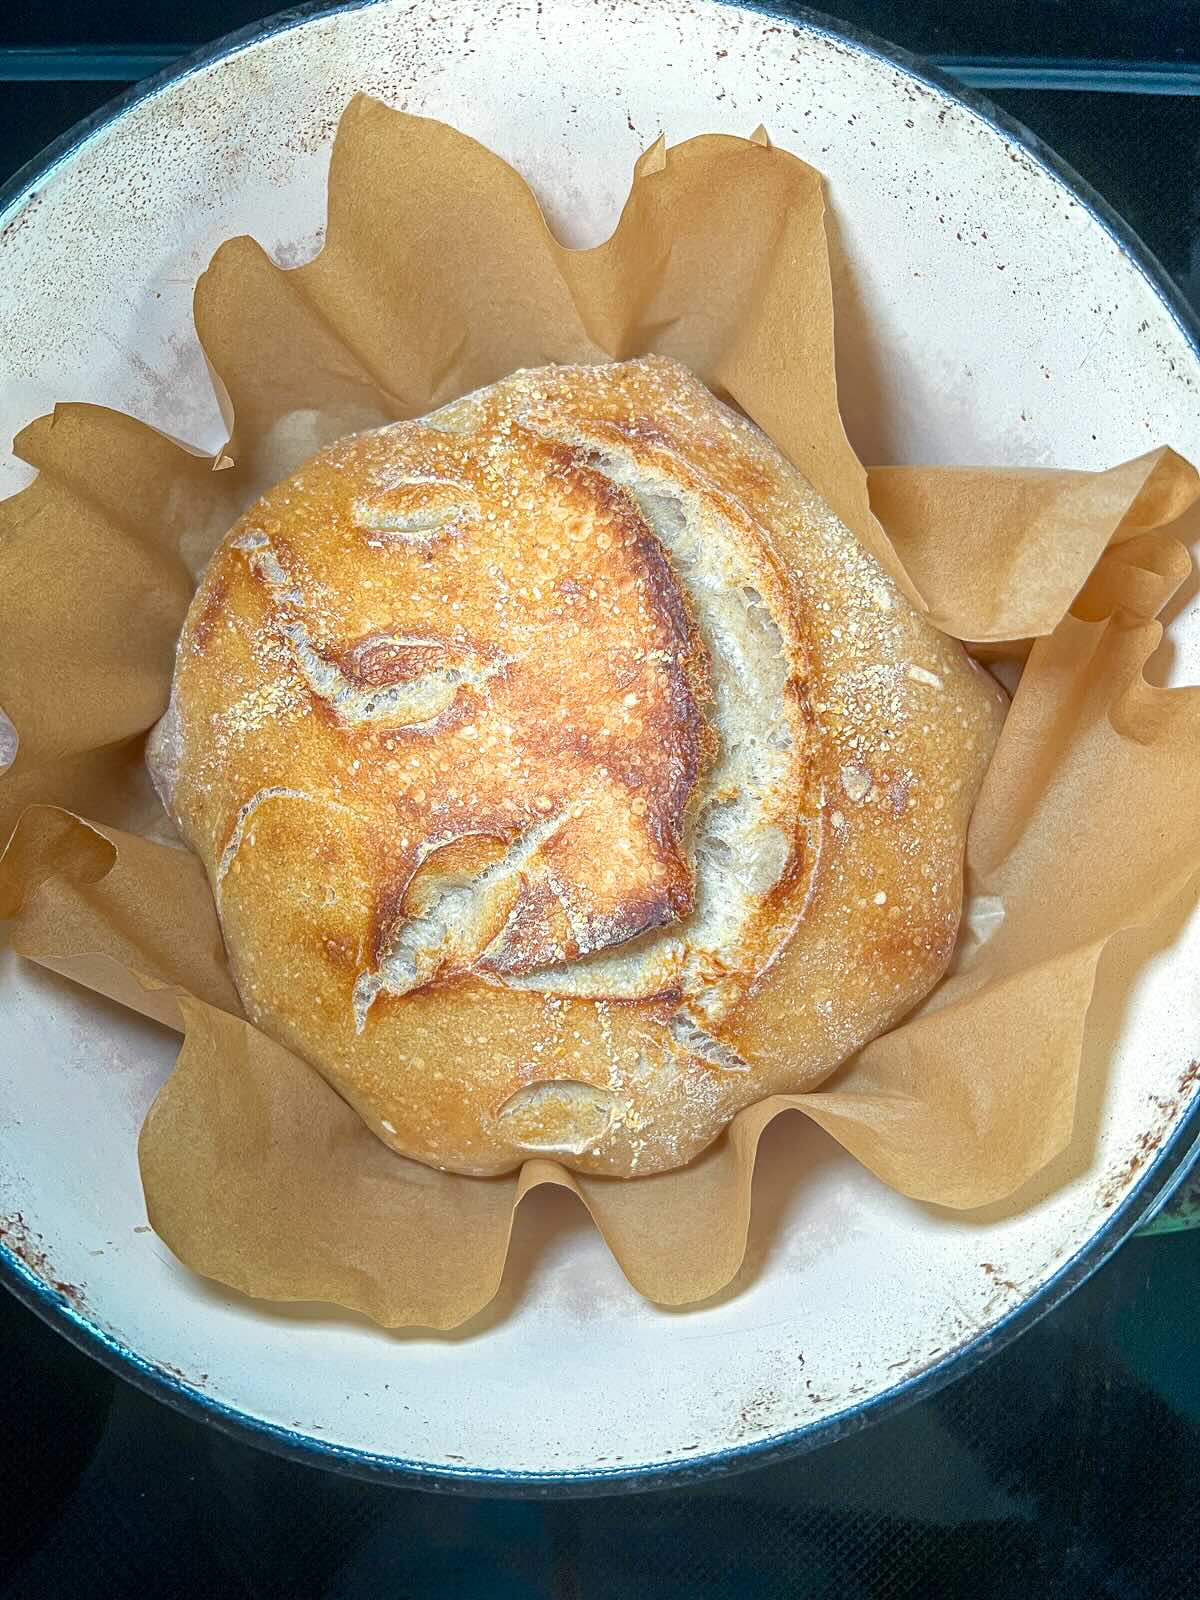
- Step 7: Transfer the dough onto a piece of parchment paper. Score the loaf with a sharp knife, bread lame, or scissors to allow it to expand while baking. Carefully lower it into the hot Dutch oven using the parchment as support. Cover with the lid and bake for 20 minutes.Remove the lid, lower the temperature to 210°C (410°F), and continue baking for an additional 20 minutes, until golden brown.
- Step 8: Cool and enjoy. Transfer the bread to a cooling rack and let it cool for at least 1 hour before slicing. This allows the crumb to set, giving you that perfect sourdough texture.
Hint
Keep your hands slightly wet while handling the dough. This helps prevent sticking and makes stretching and folding much easier.
Tips for Success
- Use a kitchen scale for accuracy. Sourdough is all about precision.
- Don't rush the fermentation; slow rising builds the best flavor.
- If your crust is too dark, tent the bread with foil during the last 10 minutes of baking to prevent further browning.
This sourdough pairs beautifully with savory dishes like my Leek Shakshuka with Tomato Sauce. The crusty bread is ideal for dipping into the rich, spiced tomato sauce.
My Sourdough Timeline
Day 1: Take about 25 g starter from the fridge, mix with 60 g all-purpose flour and 60 g warm water. Let sit overnight.
Day 2: Perform the water drop test to check if your starter is active. If ready, mix sourdough with flour, water, and salt. Let rest for 45 minutes.
Perform the pull-and-stretch method 4 times total, with 45-minute rests in between each fold.
Shape the dough on a flour-dusted wooden board, cover with a kitchen cloth, and let it rest for 30 minutes.
Transfer the dough into a bread basket and refrigerate overnight for fermentation.
Day 3: Bake the loaf according to the recipe instructions.
Storage Suggestions
- Store your sourdough bread at room temperature in a bread bag or wrapped in a kitchen towel for up to three days.
- For longer storage, slice the loaf and freeze the pieces in an airtight bag.
- I usually make two loaves, slice them, and keep them in the freezer. When I'm ready to enjoy a slice, I pop it in the toaster, and it tastes just as fresh and delicious as the day it was baked.
More Healthy Recipes & Nutrition Tips


📖 Recipe

Sourdough Bread Recipe for Beginners
Equipment
Video
Ingredients
- 125 g sourdough starter
- 400 g all-purpose flour
- 50 g whole wheat flour
- 12 g salt
- 300 g water warm
- Cornmeal for dusting
Instructions
- Test your starter: Scoop a small spoonful of starter into a glass of water. If it floats, it's active and ready to use. If it sinks, give it a few more hours to rise.
- Mix the dough: In a large bowl, combine the all-purpose flour, whole wheat flour, and salt. Add the sourdough starter and water. Mix with clean hands until the ingredients come together. The dough will be sticky; that's normal. Cover with plastic wrap and let it rest for 45 minutes.
- Stretch and fold: After resting, gently stretch one side of the dough upward and fold it over the center. Rotate the bowl and repeat on all four sides. You'll know when to stop pulling because the dough will start to resist. Cover and rest for another 45 minutes. Repeat this process four times in total, every 45 minutes. This helps strengthen the dough.
- Shape the dough: After about 4 hours, dust a wooden board with flour and transfer the dough onto it. Stretch and fold on all four sides, then use a shaping tool to form it into a round loaf. Cover with a kitchen towel and let it rest for 15-20 minutes. If it spreads out or loses its shape, reshape it.
- Overnight fermentation: Place the shaped dough into a sourdough bread basket (banneton) that has been dusted with flour or cornmeal. Cover and refrigerate overnight, ideally 12-18 hours (up to 24 hours is fine).
- Preheat the oven: The next day, preheat your oven to 240°C (465°F) with the Dutch oven inside for 20 minutes.
- Score and bake: Transfer the dough onto a piece of parchment paper. Score the loaf with a sharp knife, bread lame, or scissors to allow it to expand while baking. Carefully lower it into the hot Dutch oven using the parchment as support. Cover with the lid and bake for 20 minutes.
- Remove the lid, lower the temperature to 210°C (410°F), and continue baking for an additional 20 minutes, until golden brown.
- Cool and enjoy: Transfer the bread to a cooling rack and let it cool for at least 1 hour before slicing. This allows the crumb to set, giving you that perfect sourdough texture.
Notes
- These are the nutrition facts for 1 serving of this recipe.
- The nutrition information provided is an estimate. It will vary based on the specific ingredients used.


Teodora says
I love your bread! Tea
Dr. Nena Stefanovic says
After several attempts, I finally perfected this bread, and it was worth every trial and error. Highly recommended!